
Have you been following the Island Batik Ambassador Quilt As You Go challenge projects? Lots of fun inspiration going on this month.

I decided to make a tote to carry my mat and rulers. I pieced my fabric strips directly to a Peltex Flex Foam base which doubled as the quilting giving the seams a fun puffy definition.

Supplies:
(2) 20 1/2” wide x 23” long Peltex Flex Foam
(2) 20 1/2” wide x 23” long lining fabrics
(1) 20 1/2” wide x 23” long backing fabric
6 1/2” center square
Various 2 1/2” strips – see chart below for cutting
(1) 8” x 43” pocket fabric (optional)
(1) 7 1/2” x 20” Peltex for inside of ruler pocket (only if making pocket)
2 1/2” x 16” cardboard or corrugated plastic for bottom of bag
86” of strapping – or make your own handles
3 1/4” x 20 1/2” wide bottom border strip
Strip Cutting:

Warm colors – 2 1/2” wide strips
#2 – 6 1/2” long
#3 – 8 1/2” long
#6 – 10 1/2” long
#7 – 12 1/2” long
#10 – 14 1/2” long
#11 – 16 1/2” long
#14 – 12” long
#15 – 12” long
#18 – 8” long
#19 – 8” long
#22 – 4” long
#23 – 4” long
Cool colors - 2 1/2” wide strips
#4 – 8 1/2” long
#5 – 10 1/2” long
#8 – 12 1/2” long
#9 – 14 1/2” long
#12 – 16 1/2” long
#13 – 18 1/2” long
#16 – 12” long
#17 – 12” long
#20 – 8” long
#21 – 8” long
#24 – 4” long
#25 – 4” long
NOTES:
1. A walking foot is needed for this project.
2. Your presser foot lifter has a spring in it and it can be briefly lifted higher than the up position to more easily slide the foam in place.
3. Strips #14 - 25 have been cut shorter to save on fabric. Just center the strip in place.
4. As the block grows strips will hang over the edge but will be trimmed later.
Mark the foam
Draw a line 20 1/2” down on foam. Then mark the center vertical and horizontal of that block.

Add the Strips
Strips will be sewn clockwise starting in the upper left corner. You will sew the strips the same way you would for foundation piecing except you are sewing to the foam.


Place piece #2 pretty on top with pretty sides touching. Make edges even and sew using a 1/4” seam allowance

Flip piece #2 out. Instead of pressing the foam repeatedly with a hot iron, use a Clover Roll and Press Tool.

Continue to add strips in a clockwise direction.

Fabric will start to hang over the edge of the foam. This will be trimmed off when the block is complete. Strips 14-25 are cut shorter to save on fabric that will hang over the edge. Just center them when sewing.

After the block is finished mark a line 2 3/4” up from the bottom of the foam.

Place the edge of the bottom border strip on this line with right sides touching. Sew using a 1/4” seam. Flip out and press with the Roll and Press tool.


Topstitch 2” up from the bottom of the bag to help create a fold line for the foam. Then set this aside.
Make the Pocket (optional)
Fold pocket fabric in half. Sew the two long edges using a 1/4” seam allowance. Leave the short edge open.
Turn pretty side out. Insert the 7 1/2” x 20” Peltex strip inside the pocket and push it all the way up to the fold. Topstitch 1” from folded edge (this is the top of the pocket).

Stitch to the bag backing fabric. Line the open edge of the pocket to the bottom edge of the backing fabric. Pocket will be 1” from the top of the bag. A detailed pocket making tutorial can be found HERE.
Topstitch 2” from the bottom edge of the bag to create a fold line for the foam.

Attach Handles and Ties
Make and attach your handles. I cover store bought woven strapping.

Handles are lined up with the edge of the back pocket. NOTE: Make sure handles are facing down when attached.
Make and attach two narrow ties to the center of the front and back. You could also substitute ribbon, button and loop or snap if you like.

Assemble the Outer Bag
NOTE: Wonder Clips are easier than pinning.
Place the front and back together with pretty sides touching. Sew three sides using a 1/2” seam allowance.

Square the Corners
Draw and cut a 1 1/4” x 1 1/4” square off each bottom corner. Pull them out to square up the bottom of the bag and sew using a 1/2” seam. Set the outer bag aside.


Assemble the Lining
Make the lining of your bag but be sure to leave an opening on the bottom edge for turning.
Square the corners the same as you did for the outer bag.
Assemble the Bag
Turn the lining pretty side in and the bag pretty side out. Stuff the bag into the lining. Make sure the handles and ties are stuffed down between the layers.
Make the edges even and sew around the top of the bag.

Turn right side out through the opening left at the bottom of the lining.
Before you close this opening, top stitch around the top edge of the bag to keep everything flat.
Insert a piece of cardboard or corrugated plastic (can be found at Home Depot) into the opening at the bottom of the lining. This will be hidden between the lining and the outer bag and keep the bottom stiff. NOTE: be sure to round the edges of the insert.
Then sew the opening shut.

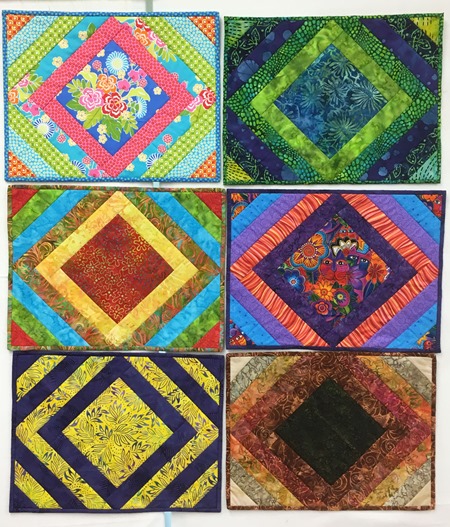
Color variations


Pair it with a flat zipper bag for your smaller rulers found HERE.


Want a faster project check out the June Taylor quilt as you go kits at Joann Fabrics and turn them into something fun!
Be sure to visit all the Island Batik Ambassadors for more Quilt as You Go Ideas.
Nan from Purrfect Spots Designs
Turid from Den Syende Himmel
Stephanie from Quilt’n Party
Pamela from Pamela Quilts
Anna from Ark Angel Creations
Kathy from Kathy’s Kwilts and More
Jessica from Desert Bloom Quilting
Connie from Freemotion by the River
Kate from Seams Like a Dream
Sharon from Yellow Cat Quilt Designs
Tina from Quilting Affection Designs
Jennifer from The Inquiring Quilter
Barb from Bejeweled Quilts
Sally from Sally’s Quilting Corner
Jeanette from Inch Worm Fabrics
Connie from Kauffman Designs
Joan from Moosestash Quilting
Bernadine from Needle and Foot
Bea from Beaquilter
Cheryl from Cheryl Lynch Quilts
Maryellen from Mary Mack’s Blog
Joyce from Hearts Creations
Marlene from Kissed Quilts
Karen from The Quilt Rambler
Marian from Seams to be Sew
Laura from Slice of Pi Quilts
Linda from Inspired Layers
Vicki from Vicki’s Crafts and Quilting
Nancy from Masterpiece Quilting
Carol from FunThreads Designs
Terri from Meanderings Along Lizard Creek
Alison from Little Bunny Quilts
Suzy from Adventurous Applique and Quilting
Jean-Sophie from Sophie Junction
Janet from Whispers of Yore
1 comment:
this tote is just gorgeous (and so is the pouch)!!
isn't that peltex foam pricey? I keep seeing patterns use it, but haven't tried it
Post a Comment