Showing posts with label Fun Tips and Tutorials. Show all posts

Saturday, September 10, 2016

Having Fun with EQ7

Today I’m going to share some tips for getting your EQ7 files cleaned up and organized. The more you create the happier you’ll be if you stay organized.


Organizing PJ7 Files with Images

Last month I gave you a tip for organizing your PJ7 files using quilt images. You can find that HERE in case you misesd it.

files


File Name Tip

Recently I’ve started to include the creation date in the project file name. It saves time not having to actually open a file and access the notecard to find that information.

For example I’d save my file as… Tiptoe Through Quilt 8-12-15.PJ7


Adding Notecards
User Manual page 41

When you’re done creating your project it’s a good idea to clean up your Sketchbook. Delete unwanted items and create Notecards for items you’re keeping. Items borrowed from the Libraries already come with the name and library location filled in.

Give your items a name and include useful information like fabric line used, creation notes, and copyright date. Be sure to include searchable terms so EQ will include your block in library searches…more on that next.

To make a Notecard…Open SKETCHBOOK> select an item>click NOTECARD

363


Create Custom Libraries
User Manual page 61-64

EQ7 let’s you create your own libraries to store items you’ve created. Items you add will be included in searches and can be added to any project Sketchbook. This is where those Notecards come in handy.

Start by accessing the library you want to add to….LIBRARIES>BLOCK LIBRARY (or library of your choice). Have you noticed the tab called MY LIBRARY?

777

Click the MY LIBRARY tab> click ADD LIBRARY button. A dialog box opens allowing you to name your library and select how many subfolders or “styles” you want in it.

999

Once your Libary is set up you can change the subfolder or “style” names by right clicking on them and selecting modify style.

77


Add Items to My Library

Step 1 – Open the LIBRARY folder you want to add to.

Click LIBRARIES>BLOCK LIBRARY (or library of your choice)

Step 2 – Click the SKETCHBOOK tab and you’ll see the project contents. Select the items you want to save and click COPY. Notice you’re viewing the Sketchbook contents from the Block Libraries (top of screen) so the options at the bottom are different.

Hint: you can select multiple items by holding CTRL and clicking on them or select everything at once by holding CTRL and clicking A.

555

Step 3 – Click the MY LIBRARIES tab and make sure the subfolder is selected. Click PASTE to place the items in the library subfolder.

Notice that the library I just saved into, RANDOM MOTIF>FLOWERS, now appears on the item’s Notecard. Now your item will be included in EQ7 searches. Remember if you want to go directly to the items you have to look in the MY LIBRARY tab.

353


I hope you learned something new or helpful.

Hop over to Electric Quilt and enter to win this months prizes.

#eq25

More blogs posting tips, tricks and tutorials today.

Marian of Seams to be Sew

Pamela of Pamela Quilts

Mary of Quiltin Grandma

Carol of FunThreads Designs (me)

Quiltshop Gal

Sunday, May 1, 2016

Quiltmakers 100 Blocks Hop with giveaway

Here it is. My little block that’s in Quiltmaker’s 100 Blocks magazine. Did you guess which one was mine?

spring bloomers funthreads designs

There it is, Spring Bloomers. How cool is that?

quiltmaker block funthreads designs (2)

But wait…it gets even better…It made the cover too!!! I’m soooo excited.

funthreads designs 100 blocks issue

If you like shortcuts as much as I do here’s a little tip…

In the magazine the watering can template is drawn as multiple parts. When you trace it onto your paper backed fusible draw it as one piece.Then use stitching to complete the design marked in red below. It’ll save time and still look like you used multiple applique pieces. tulip templates.

You can do the same thing with the bottom leaves. Draw them as one piece, tuck the tulip behind the middle leaf, and use stitching to make it look like multiple appliques were used.

template funthreads designs

I played with lots of layouts and colorways in EQ7 before submitting my design. I have to keep my final quilt a secret a little longer because it’ll make it’s debut in the Quilts from Quiltmaker’s 100 Blocks magazine this summer. But here are some ideas to get your imagination working.

tulip layout funthreads designs

tulip 2 funthreads designs

tulip 1 funthreads designs

tulip 3 funthreads designs

tulip 5 funthreads designs

tulip 4 funthreads designs

What will you do with your Spring Bloomers?


Sweepstakes Give Away

I’m giving two winners a copy of Quiltmaker’s 100 Blocks magazine. Enter Rafflecopter below for a chance to win.

a Rafflecopter giveaway


Guidelines and Rules for FunThreads Designs give away.
  • No purchase necessary. 
  • You must be 18 or older to enter.
  • While we hope you will leave a comment on the post of the day because we love comments, we want no reply bloggers to have a chance at winning also. Rafflecopter will collect your name, country, and email. 
  • One copy of Quiltmaker’s 100 blocks magazine will be given away to two winners.
  • Winners picked at random via Rafflecopter at the end of the day on May, 6th. Winner will receive notification via email. Winner will have approximately 5 days to claim their gift, if 5 days passes, the gift will be offered to another eligible entrant. Winner who will receive a shipped item will need to provide name, address, city, state. All prizes will be awarded.
  • Winner will be announced on this blog and in the Rafflecopter window here on this page.Winner agrees to allow their name, city, state to be publicized.
  • Odds of Winning a prize are based on total number of rafflecopter entries.
  • You are responsible for claiming and paying any tax owed on the value of any gift that you win where applicable.Some restrictions on gifts will apply based on shipping policies.This sweepstakes is void where prohibited by law.

Friday, March 11, 2016

Fun Friday with Great Deals…

Another Fun Friday!!

needle rest (2)

Choosing the right hand sewing needle can be overwhelming. If you’re like me, easy threading needles might be just what you need.

Visit QuiltWoman.com blog and take a peek at my guest post all about hand sewing needles.


National Craft Month continues…

There are so many great deals to be had. Craftsy is offering class bundles at 50% off until Sunday. What a great way to perfect your skills or try a new one. I’ve enjoyed all my Craftsy classes. They are always so well done.

QuiltingBundleSale


Who doesn’t like Give Aways!!!

 Enter on Craftsy

NationalCraftMonthGiveawaySmall

Have a wonderful weekend…do something fun!

Sunday, February 21, 2016

On Pins and Needles

Are you “on pins and needles” when it comes to, well, pins and needles?

Do you give them any thought at all?

They’re our smallest tool but have the most important job. Join me for a guest post over on the QuiltWoman.com blog to get to the point about pins.

OLYMPUS DIGITAL CAMERA

And of course… I included one of my favorite videos for some fun. You’ll be amazed at how graphic designer, Christophe Thockler, used his pins and thread for his Favorite Place by Black Books video. 

Favorite place_thumb[2]Image and video used with permission by Christophe Thockler

Friday, December 11, 2015

Fun Tip Friday


Want to cut perfect teeny tiny applique pieces and nice smooth curves?


I spotted KAI serrated scissors at the Houston show last year. Now they’re my favorite “go to” scissors when cutting applique. One blade is serrated and grips the fabric while you cut. No more fabric slipping or wiggling away as the scissors close ~ don’t you just hate when that happens. They make cutting teeny tiny applique pieces a breeze.


Have a great Friday!

Friday, December 4, 2015

Fun Tip Friday

Today I’m going to share a happy storage tip…

When I purchase package stabilizers I only crack open one side of the package. This way I can pull out the stabilizer like you do kitchen wrap while keeping the rest of the roll neat in the box with the label on it.

sulky tip 2

Have a fun weekend! Do you have your decorations up for the holidays!

Friday, November 13, 2015

Spiral Eye Needles and a Give Away

 
Most of you know I like to play with new sewing “toys” …well, I fell in LOVE with Spiral Eye needles after the first try!
 
spiraleyeneedles dot com (1)
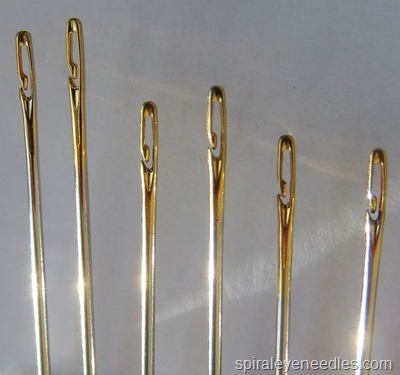
SENCH side loading needles
 
Ahhh, did that photo get your attention? They got my attention when they scrolled past on Facebook a few weeks ago. I ran over and purchased a set. These wonderful side loading needles were created by inventor, Pam Turner of PST Innovations, LLC (spiraleyeneedles.com).
 
 
Why I liked these better than the “split eye” needles available at fabric stores? For starters they easily loaded from the side and DIDN’T shred my rayon threads like the split eye needle often does (so annoying). The thread DIDN’T fall back out of the eye while being pulled through the thickness of a quilt top like the split eye needle often does (again so annoying). They made hiding thread tails a breeze while using my longarm (heavenly).
 
spiraleyeneedles dot com (2)
Spiral Eye side loading needles
 
NEEDLE DETAILS:
 
  • Spiral Eye needles are made in the USA from surgical grade stainless steel so they never rust and they won't break and they’re hypoallergenic.  
  • SENCH needles are a new less expensive variation made in China. They’re Nickel plated steel with a golden plated eye.
 
Stocking Stuffer Sale…SENCH needles are on sale until November 30th. Buy two sets and get one free at spiraleyeneedles.com.
 
There’s also a side loading machine needle available but I haven’t tried it yet.
 
machineneedlepoint
Side loading machine needle
 
FUN STUFF:
 
If you’re still not convinced here’s a YouTube video showing you how they work. Click HERE.
 
For a real WOW moment check out this nifty video by Sue Heinz of Kismet Quilting demonstrating not only how wonderful these needles are to use but also showing several AWESOME knot making tips. Click HERE.


Sweepstakes

Pam Turner is graciously giving one set of 6 SENCH needles to one winner and one single Spiral Eye needle to one winner. Just use the Rafflecopter below for a chance to enter.

a Rafflecopter giveaway


Guidelines and Rules:
  • No purchase necessary. Open to residents of the USA only. This sweepstakes is void where prohibited by law.
  • You must be 18 or older to enter.
  • One set of 6 SENCH needles to one winner and one single Spiral Eye needle to one winner will be given. Winners picked at random via Rafflecopter.
  • Winners will be picked at the end of the day on November 16th. Winners will receive notification via email. Winners have approximately 5 days to claim their gift, if 5 days passes, the gift will be offered to another eligible entrant. Winners who will receive a shipped item will need to provide name, address, city, state. All prizes will be awarded.
  • All winners will be announced on this blog and in the Rafflecopter window here on this page.Winners agree to allow their name, city, state to be publicized.
  • While we hope you will leave a comment on the post of the day because we love comments, we want no reply bloggers to have a chance at winning also. You will be asked for your name, email, and state.
  • Items will be mailed directly from PST Innovations LLC, P.O. Box 49605 Blaine MN 55449.
  • You are responsible for claiming and paying any tax owed on the value of any gift that you win where applicable.
  • Odds of Winning a prize are based on total number of rafflecopter entries.
  •  


    SENCH and Spiral Eye needle images used with permission from PST Innovations, LLC.

    Friday, October 16, 2015

    Fun Tip Friday

    Don’t be afraid to play with color when designing your quilt. Different color concentrations will highlight the other fabrics in different ways. Just look at the difference one color change can make.

    The cheddar squares really jump forward highlighting the cream fabrics. In the second quilt the tomato color squares pulled the darker fabrics forward and draw your eye to all the little red flowers. They just pop in the second quilt.

    picking quilt colors♥Thank you♥ Bev for letting us play with your quilt top

    When shopping try stacking all your fabrics next to each other and step back. Look at what colors and design elements stand out to you and which don’t. Is there a particular element that you want to highlight? Use more of that color to pull it forward.

    Give it the squint test. Squinting and looking at the stack of fabric will blurr everything a bit and let you focus on the colors. Sounds funny but it really works.

    Halloween Haunts Hop started today….

    Have great weekend!!!

    Friday, October 9, 2015

    Fun Friday Tip

    Going on a retreat weekend?

    Pack your sewing stuff in a giant suitcase with wheels. No more juggling multiple tote bags and digging through boxes. Condensed in one neat place, easy to pull along, fast to set everything up and take down.

    retreat suitcase

    I packed my thread drawers, box of tools, machine tray, big rulers, fabrics, and more. You can keep the suitcase of fabric under your work station for easy access too.

    Have a Fun Weekend!!!

    Thursday, September 10, 2015

    Fun Friday Tips and Tutorials

    Perk up a boring pillow with some shaggy cuddle fabric.

    P8060553

    Cut a 3 1/2” wide strip. Fold the strip in half with wrong sides together. Pin and sew to the pillow edge. Then finish the pillow like you normally would.

    NOTE: Have a vacuum handy!!! This stuff makes a fluffy mess

    unfinished viewed from the back - cuddle fabric added to edgeP8060552

    Another fun pillow.

    mardi gras pillow

    Tada! Fun!!

    Friday, September 4, 2015

    Fun Friday Tip

    Today I’m going to share my favorite sewing tool which really isn’t a sewing tool at all. It’s a hemostat, that clampy thingy doctors use. These are my best friend after “Jack the seam ripper”.

    hemostat

    They’re great for grabbing hard to reach lint balls while cleaning my machine, changing machine needles, pulling needles that get stuck in my machine or batting, grabbing thread tails that are too short for my pudgy fingers, and so much more.

    You can find them on Amazon for a few dollars or you might find a doctor that let’s you keep them. Actually, I think my doctor thought I was off my rocker the last time I had stitches. After telling him how I lost my battle with the rotary cutter and then telling him all the great things I could use the hemostats for he just handed them to me and walked away. Hahahaha

    Happy Long Sewing Weekend!!!!!


    affiliate link

    Craftsy

    Friday, August 28, 2015

    Fun Friday Tip

    Do the words “fusible applique” scare you? They don’t have to.

    I just spotted this free Machine Applique E-Guide from Landauer. It has all the tips and tricks you need to know collected in one place ~ Woot! It’s a must print for your sewing room reference notebook.

    Lots of great photos detailing how to work with fusible web, stitch curves and corners, and how to use those decorative machine stitches to add detail. LOVE it!!

    Everything you need to know! Go grab your copy!

    EMAILCOVER600AppliqueBasics_quiltbooksandbeyond 

    Happy Friday!!!

    Friday, August 21, 2015

    Applique Overlay

    funtip full size

    Back in May I shared a quick tutorial on using your applique placement guide under your pressing sheet to pre-fuse your shapes into one unit. BUT….. What if you’re working with a dark fabric that you can’t see through or pieces that aren’t actually connected?? Well… here’s another way to use your applique placement guide.


    Pick up a cheap piece of vinyl from Wal-Mart. I used a dry erase marker so I could wipe off my sheet and reuse it. You could also use a permanent marker if you don’t mind throwing your sheet out after each project.

    Slide the placement guide under the vinyl and trace off as much detail as you need to aid in the placement of the pieces. I only marked the general shape outline and a few specific points.

    P8060557

    I placed my block on a pressing board, centered the design over it, and pinned the top edge to the board through all the layers. This way the vinyl sheet can be lifted and lowered as needed and gives you easy access to press as you go.

    P8060559

    P8060572
    Tada! Tedious placement is fast and easy.

    P8110573


    Now go have some fusible FUN!


    If you want to learn this trick and a whole lot more check out some classes on Craftsy.

    I just finished Fun With Fusible Applique by Debby Luttrell. She walks you through everything you need to know about making fusible applique. Even I learned three fun new tricks from her class and I’ve been doing this a long time.

    affiliate link for easy access