
Now that you’ve finished your block from the blog hop let’s put it in the quilt.
finished size 50 x 50
©2013 Carol Steely
Step 1 – Select a Pre-made Quilt Layout
Open the file for the block you want to work with. I’m working with my Summer Piglet block from the blog hop but any block will work.
Open LIBRARIES>LAYOUT LIBRARY>BASICS BY STYLE>MEDALLIONS HORIZONTAL>HORIZONTAL-CENTER MEDALLIONS 21. Add this to your Sketchbook.

Step 2 – Place Quilt on Worktable
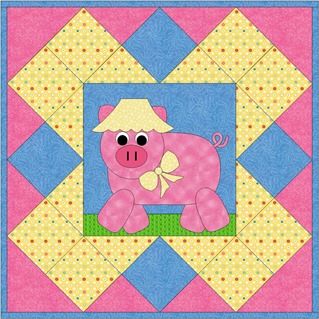
Open Sketchbook and place the quilt on the worktable.
Step 3 – Add Center Block
Click on the Adjust Tool then click on the center of the quilt. You can see at the top of the screen that this center block is 24 x 24.
Click Set Block . Grab your block from the pop up menu and drag it to the center of the quilt.

The block was drawn 10 x 10 so we have to resize it to fit.

Step 4 – Adjust Block
Click the Adjust then click on the piglet.
At the top of the screen set the block size to 24 x 24.
Grab the block and move it in to place (set point should read 12 x 12)
Save to Sketchbook.

Step 5 – Color
Grab your Paintbrushand color the quilt. If you want to match fabrics used in the center block just click them with the Eyedropper
. EQ will match and select them for you.

How easy peezy was that!
How To Print Patterns
Step 6 – Print for Hand Applique
If you are doing hand applique just click the Pick Tool then click the piglet.
Open FILE>PRINT>TEMPLATES. Skip to step 8 to adjust templates before printing.
Step 7 – Reverse Templates for Fusible Applique
If you are doing fusible applique you need to follow a few more steps since the templates need to be printed in reverse.
Click Flip Block and click on the piglet. The block will reverse. You DO NOT need to save this to Sketchbook. It’s just for printing purposes.

Select the pick tool and click on the piglet. Now open FILE>PRINT>TEMPLATES. Skip to step 8 to adjust templates before printing.
Step 8 – Adjust Templates Before Printing
Since the original piglet was drawn in EasyDraw + Patchdraw it will include the background block as a template. I like to rotary cut my pieces so I will delete these from the templates to save paper.
Click Preview.

Click DELETE at the top of the screen then click the shape you want to delete (both background pieces). They will turn red.
Click the DELETE key on your keyboard to remove it permanently.
When ready click PRINT.

Step 9 – Print the Rest of the Quilt
Use the Pick Tool and click on the piglet again. Open PRINT>ROTARY CUTTING. This time you will get the measurements for the background of the block.
Use the Pick Tool and click on the other blocks in the quilt. Open PRINT>ROTARY CUTTING to get their measurements.
You will find yardage under PRINT>FABRIC YARDAGE.
Enjoy Your Quilt!
4 comments:
it's sew oinking cute! the quilt layouts are something I just found the other day too, going to play some more with them. Isn't there a feature when you print a template, a button to click to reverse the template? I always forget to click it, but remember seeing in SOMEWHERE
WOW! I like that! Thank you very much for your great instruccions! Have a nice day!
This is really cute. Thanks for the tutorial
What an adorable quilt and block. Thank you so much for the wonderful tutorial.
Post a Comment