I’ve been busy writing EQ7 tutorials for my class and thought I’d share some information about the Brush Stroke Tool. This is a hidden tool that you have to add to the tool bar.
Add the Brush Tool – See Owner Manual page 172-173
1. Click the Customize Toolbar button. Click Add/Remove Buttons. Click the Brush Stroke Tool
.
This is a fun tool. It allows you to draw two lines at once. You can easily draw stems and vines with this tool.
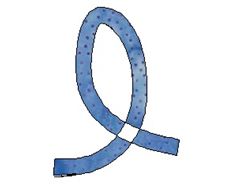
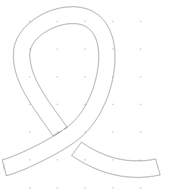
This tool does have a few limitations. It has limited node control for shaping and if you loop a line back over itself it will leave a blank space when coloring your design. I will teach you how to fake a cross over line in this lesson.
You can convert a brush stroke in to a patch for additional shaping of the outer edges. For example giving a stem a thorny look. You can also combine it with the Freehand, Bezier and Line Tools to make more detailed drawings easily.
Precision Bar Settings
There are seven line styles.
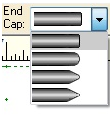
There are four end cap styles.
The Minimum Width number refers to the taper of the end cap. The Boldness refers to the thickness of the line on either side of the spine.
Drawing with the Brush Tool
2. Let’s draw a few lines and a curl. Try adjusting them with the Shape Tool. Notice as you adjust the shape the width of the line does not change. It stays consistent.
3. Click CTRL and the A key to select all the shapes as a group. Click Delete.
You can see how it would be fast and easy to make stemmed flowers. Jus draw a stem, copy and paste a flower from your Sketchbook, and add a few leaves using the Oval Tool.
Combine the Tools
For more detailed drawing let’s combine the Brush Stroke Tool with the other Line Tools. You can double click on lines made by the other line tools with the Brush Stroke Tool. It will convert the single lines to brush lines. This is an easy and accurate way to make detailed stems and branches.
1. Draw a center line using the Line Tool .
2. Draw a smaller side branch using the Bezier Tool . Make a second symmetrical branch by cloning
, flipping
and moving it in to place on the other side. A fast perfectly symmetrical branch design.
3. Now select the Brush Stroke Tool . Set the Precision Bar settings to:
Contour: first selection
End Caps: first selection
Min. Width: 0
Boldness: 2
4. Double click on each line and then convert to a patch .Tada~stems!
5. Add a flower from your Sketchbook. Create some leaves using the Oval tool.
6. Color and save to sketchbook. Fast and easy!
Faking an Overlap
If you draw a line that loops back over itself with the Brush Stroke Tool it will create a hole when you try to color it. Remember the piglet’s tail from the previous tutorial?
To fake a continuous loop you have to draw it in two parts. The end of the first loop should touch the curve but not cross under it. The second line segment should be tucked behind the first. Click SEND TO BACK to order it properly.
When it’s colored it will look like one continuous loop. A nifty little trick!
Have fun creating stems, branches, and curly things!


2 comments:
Excellent tutorial. Thank you! I definitely want to add this to my list of favorite tutorials.
SewCalGal
www.sewcalgal.blogspot.com
Nice tutorial. This is one of my favorite tools in EQ, but I never thought about the fake looping. Very cool trick, thank you.
Post a Comment