Import an Image for Tracing
Any image can be scanned and imported for tracing. A reminder to please abide by image copyrights when doing so though.
We will use the file exported from the last lesson as our example of an imported image for tracing.
Set up the work table
1. On the block worktable select BLOCK>NEW BLOCK>PATCHDRAW BLOCK
2. Working on the Appliqué Tab select the Pick Tool . Enter the following on your Precision Bar.
Block size: 10 x 10
Snaps: 40 x 40
Graph paper: 2 x 2
Snap Options: Default settings
Import and image for tracing
3. At the bottom of the worktable click the Trace Image Tab.
4. On the left side of the worktable you will notice a new set of tools. Click the Import Image . An Import Image Dialog Box will open.
5. In the dialog box search and find the CONE file we creaeted on your desktop. Select it and click OPEN.
6. A Crop Image Dialog Box will open. All the editing features in this box can also be done on the worktable once the image is set. We aren’t going to make any changes at this time. Click OK.
7. Click on the block to set the image.
8. Select the Appliqué Tab.
9. You now have an image that can be traced and used to create an appliqué design.
Trace the Image
Remember all your appliqué shapes must be closed patches. You can check this by toggling the Hide/Show Auto Fill button or by going to the Color Tab.
10. Use the Bezier Curve Tool to roughly trace your top layer of ice cream. Use the Shape Tool
to fine tune it to your liking. Save to Sketchbook.
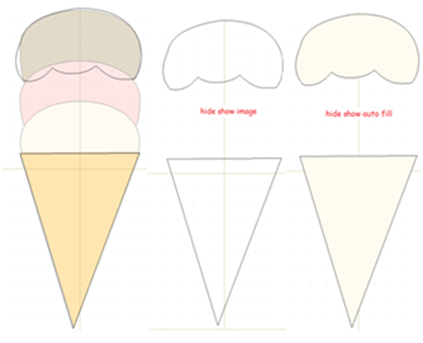
11. You can toggle the Hide/Show Image button to see your shape without the background image (example 2 below). Use the Hide/Show Auto Fill
to make sure you have closed patches (example 3 below).
12. Continue tracing the next two layers of ice cream and the cone. Make each patch overlap the previous one just slightly to eliminate excess fabric bulk in your design. Use the Shape Tool to adjust to your liking. Select each layer as it’s finished and order to back
.
13. Save to Sketchbook.
14. Click BLOCK>DELETE TRACING IMAGE. The background image will be removed and you will be dropped on to the Tracing Image Worktable. Don’t panic your design did not disappear. Go back to the Appliqué Worktable and click Refresh .
I think I want a cherry on top. How about you?
15. Select the entire object as a group. Hold CTRL and drag the corner node to resize it proportionately to make room for the cherry on top.
16. Add the cherry on top.
Place Block on Point
17. Click CTRL and the A key to select the image as a group.
18. On the Precision Bar, enter 45 in the Angle of Rotation box.
19. Color and Save to Sketchbook.
End of Lesson
Was this helpful to you?


2 comments:
As a new EQ7 user, I REALLY enjoyed reading your instructions and the accompanying illustrations make it seem as easy as the demo :>) I now feel confident about playing with a simple photo. Thank you!
Can you do a lesson on on point blocks? I guess you have to design them on their side and have the inside at 45"? And then set them into a on point layout? What if you want to use a different layout? How do you get the block so the inside is a 'diamond' shape (all 4 sides equal)? Is there a quick way to do this or Am I making this harder than it is?
Post a Comment